Getting Started with BusyCal for Mac
This tutorial walks you through setting up BusyCal and covers its main features.
Introduction
BusyCal is a calendar and task management app for macOS (optimized for Apple Silicon) with features beyond the built-in Calendar and Reminders apps.
Key features include customizable calendar views, integrated tasks that display in the calendar and carry forward until completed (can be disabled), an embedded Info Panel for viewing and editing events, support for graphics, weather and moon phases, a menu bar app for quick access to your day's events, and more.
Setup Assistant
After installing the BusyCal trial, or purchasing it, open BusyCal and you’re presented with the Setup Assistant. This is only presented to you the first time, as it walks you through a number of steps, including requests for permission to perform the following functions:
- Access to Contacts — BusyCal requires access to Contacts for displaying birthdays, death anniversaries, meeting invitations, and email alarms, and for intelligently auto-completing addresses.
- Access to Location Services — BusyCal requires access to Location Services for displaying real-time weather at your current location.
- Access to Reminders — BusyCal requires access to the Reminders app to seamlessly sync and display all your tasks.
If you skipped past the setup assistant, don't worry - simply open System Settings on your Mac, navigate to Privacy & Security, and grant BusyCal access to Contacts, Location Services, and Reminders.
Syncing with iCloud, Exchange, and Google Calendar
Once you’ve completed the setup assistant, the next step is to add your individual accounts to BusyCal, such as iCloud, Google, Office 365, Fastmail, Zimbra, and others. For security reasons, BusyCal cannot automatically access account details already stored in macOS System Settings. You will need to add these accounts manually under BusyCal Settings > Accounts.
If you’re setting up BusyCal on a new Mac and have used it on another device before, a list of your
added accounts will appear under BusyCal Settings > Accounts. Simply click Use Account and re-enter your credentials
when prompted. If no accounts are listed, you can add them manually by clicking the [+] button under BusyCal Settings > Accounts.
BusyCal cannot sync or automatically import On My Mac calendars from Apple Calendar (i.e. calendars that are not otherwise stored on iCloud). To bring these events into BusyCal, you’ll need to manually export your On My Mac events from Apple Calendar and then import them into BusyCal.
Syncing with an iOS Device
BusyCal syncs with the built-in Calendar and Reminders apps on iOS, as well as with BusyCal for iOS, through cloud services (iCloud, Exchange, Google, or CalDAV servers). If you're already syncing calendars between your Mac and iOS device through a cloud service, your iOS device will sync with BusyCal once you configure the same account.
BusyCal syncs calendars with an iOS device only through cloud-based services. BusyCal does not sync local “On My Mac” calendars with an iOS device.
For more information, see Syncing BusyCal with an iOS Device.
Calendar Panel (Left Panel)
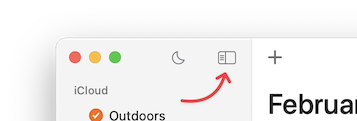
The Calendar List in the left sidebar displays all your calendars in an organized, easy-to-navigate layout.
If the sidebar isn't visible, choose View > Show Calendar List, press ⌘-Option-C, or click the Hide/Show Calendar List button on the left side of the toolbar.
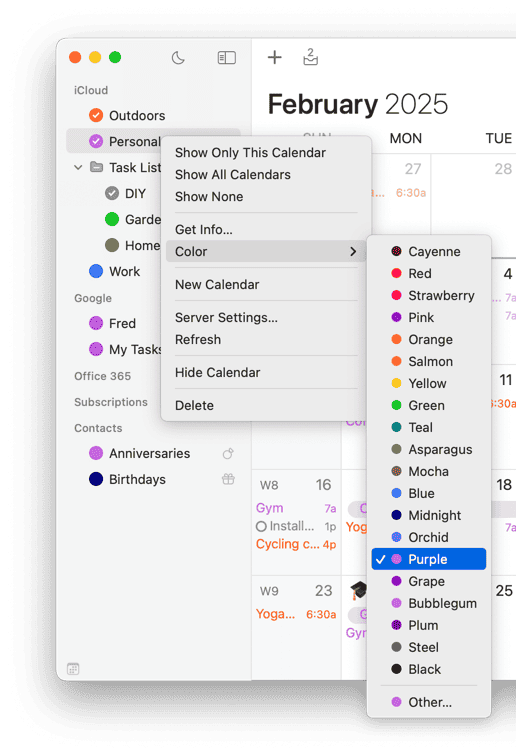
Calendars are grouped by source:
- On My Mac — Calendars stored locally on your Mac for private events and offline access.
- iCloud, Google, Exchange, etc. — Calendars hosted on cloud servers such as iCloud, Google Calendar, Exchange, Fruux, or other CalDAV servers.
- Other — Special calendars displaying birthdays, death and wedding anniversaries from macOS Contacts or BusyContacts, plus read-only subscriptions from WebDAV servers, such as holiday and sports calendars.
To change the color of a calendar (and all its events), Control-click the calendar and choose a color from the Color submenu.
Views
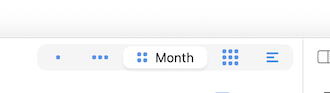
BusyCal provides several views: Day, Week, Month, Year, and List. Click the toolbar buttons to switch between them.
Year view is especially useful as a year overview for planning. It can also be switched into a Year Planner layout and customized with different display styles and highlights — see Year View.
Scrolling Views
You can scroll the view a full page at a time, or incrementally. To jump back to the current day, week, or month, click the Today button or choose View > Go To Today (⌘-T).
Click the navigation arrows to scroll forward/backward by one page (e.g. a month in Month view or a week in Week view), or Option-click them to move by smaller increments. You can also scroll with your trackpad, Magic Mouse, or scroll wheel. For keyboard navigation, see Calendar Navigation Shortcuts.
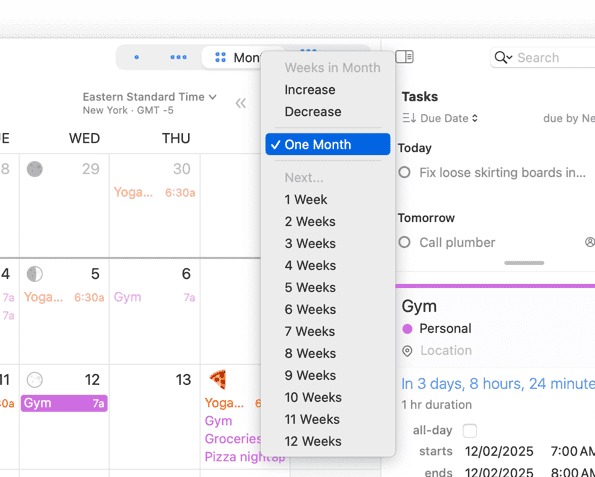
Customizing the Number of Weeks per Month and Days per Week
You can choose the number of weeks to show in the Month View (from 1–12 weeks) by choosing View > Weeks in Month and choosing from the available options. This is particularly useful when you’re nearing the end of the month and want to see what’s ahead without having to scroll to the next month.
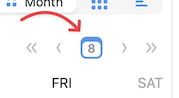
You can also CTRL+Click (right-click) on the Month view-selector button in the navigation area to reveal a menu.
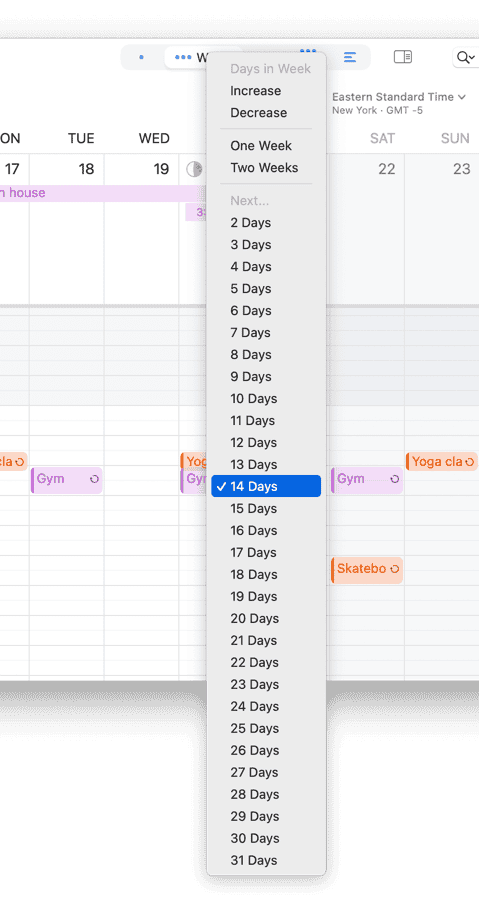
Likewise, you can choose the number of days to show in Week View (from 2–14 days) by choosing View > Days in Week
and choosing from the available options, or CTRL+Click (right-click) on the Week view-selector button in the navigation area to reveal a menu.
Here's a video demonstrating this:

Changing Number of Hours Viewed in Day & Week Views
You can choose how many hours are displayed in Day and Week views, from 4 to 24 hours.
Adjusting Hours Directly in the Calendar View
You can also dynamically adjust the visible hours on-the-fly while using Day or Week view:
- Option + Scroll – Hold
Optionand scroll up/down anywhere to zoom in/out. - Timeline Scroll – Hover over the left-side time ruler and scroll:
- Scroll up to zoom in (show fewer hours).
- Scroll down to zoom out (show more hours).
- Click + Drag – Click and drag on the left-side time ruler to manually adjust the hours displayed.
Show Working Hours Only
If you want to focus on your working hours and hide the rest:
Use the Working Hours toggle button in the toolbar (next to the date switcher) to quickly collapse hours outside your Day Start and Day End settings.
This setting is remembered per Smart Filter, so switching views can automatically toggle working hours on or off.
Customizing the Calendar Appearance
You can customize your calendar's appearance—font face and size, time format, and other visual options—in BusyCal > Settings > Appearance.
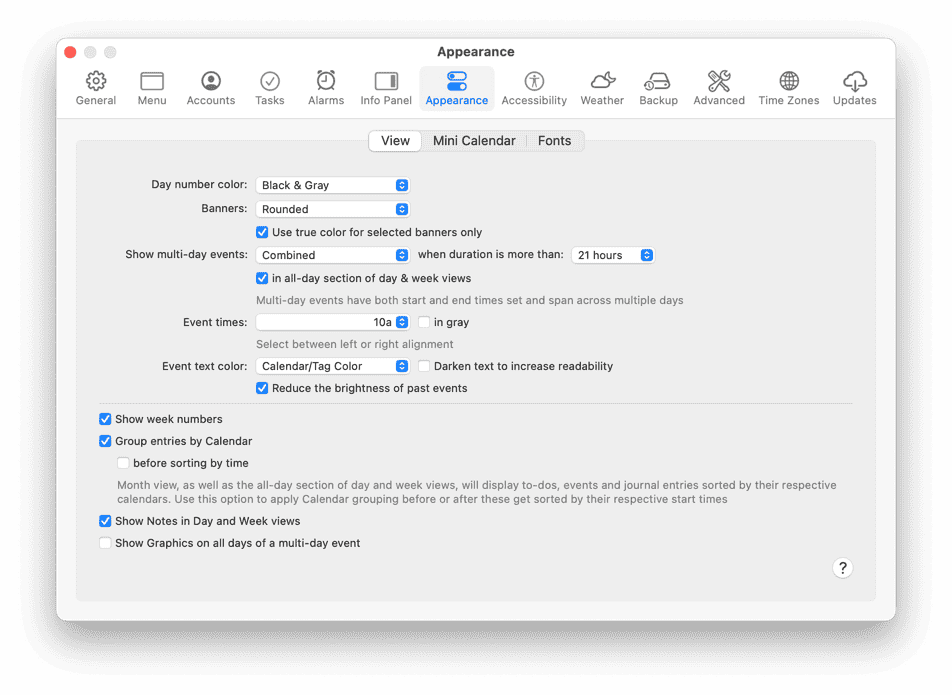
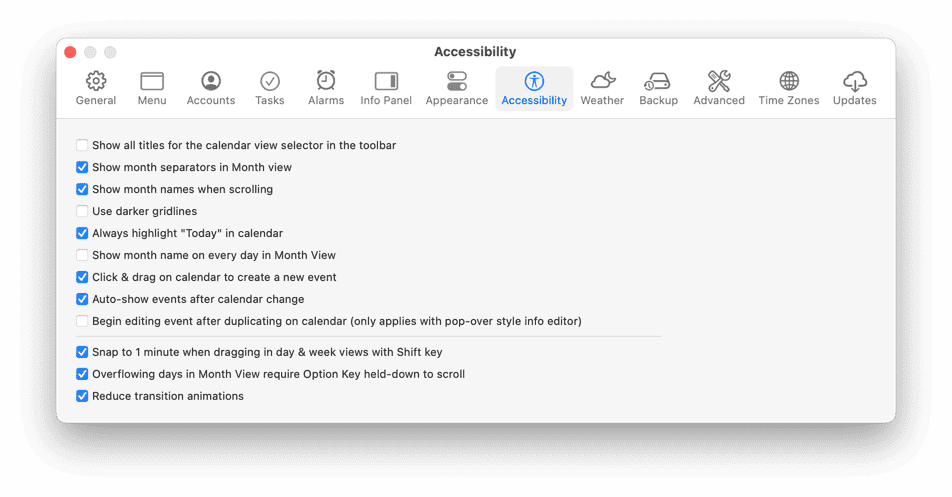
Additional appearance settings can be customized under BusyCal > Settings > Accessibility.
For more information, see Appearance Settings.
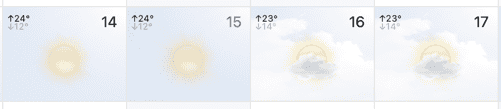
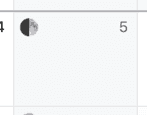
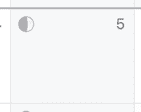
Weather
While we’re on the subject of customizing the appearance of your calendar, you may have noticed the 8-day weather forecast and moon phases that appear in the calendar. You can customize these settings by choosing BusyCal > Settings > Weather.
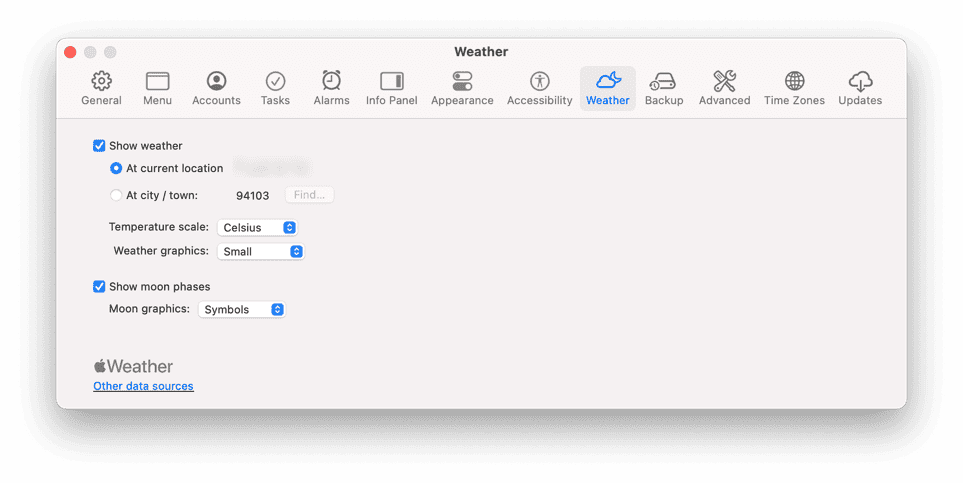
Weather Graphics
You can choose one of three different formats for the weather graphics: Small, Large, or Background:
Moon Graphics
And you can display moon phases in three different formats: Realistic, Symbols, or Astrological:
For more information, see Weather.
Events
BusyCal supports the following event types:
- Banner — An all-day event that can span multiple days.
- Event — An event with a start and end time.
- Dated Task — A task with a due date that appears in the calendar and/or Task List. See Tasks for more information.
- Timed Task — A task with a due date and time that appears in the calendar and/or Task List. See Tasks for more information
- Undated Task — A task with no due date that appears only in the Task List. See Tasks for more information.
- Sticky — A floating yellow sticky note attached to a date.
- Journal — A Journal event is similar to an all-day event. It occurs on a date, but has no start or end time, and does not occupy any time in your calendar. Journal events can be useful for recording information that occurred on a specific date, such as the details of a discussion, a list of accomplishments, or a diary entry.
- Graphic — A floating graphic attached to a date. Graphics may also be attached to events. See Graphics for more information.
To create a new event, double-click on a date in the calendar, choose File > New Event, Control-click on a day and choose New Event, or press ⌘-N. (You can create other event types using the File menu, by Control-clicking, or using keyboard shortcuts.) You can edit event details in the Info Panel (described just ahead).
For more information, see Event Types.
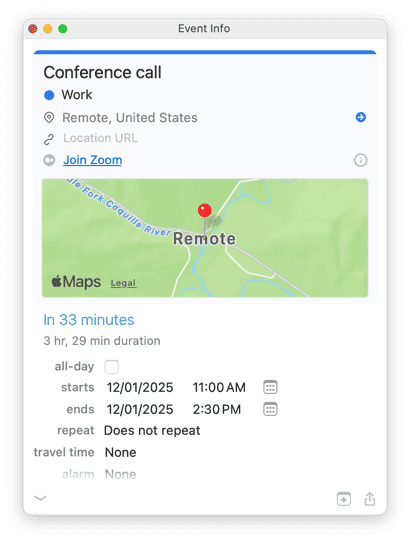
Info Panel
BusyCal includes an Info Panel for viewing and editing event details, which may appear in any of three locations: in the righthand sidebar, as a floating window, or as a popover in the main calendar view. You can move between fields on the Info Panel with the Tab key.
Info Panel in Sidebar
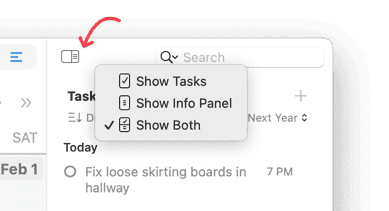
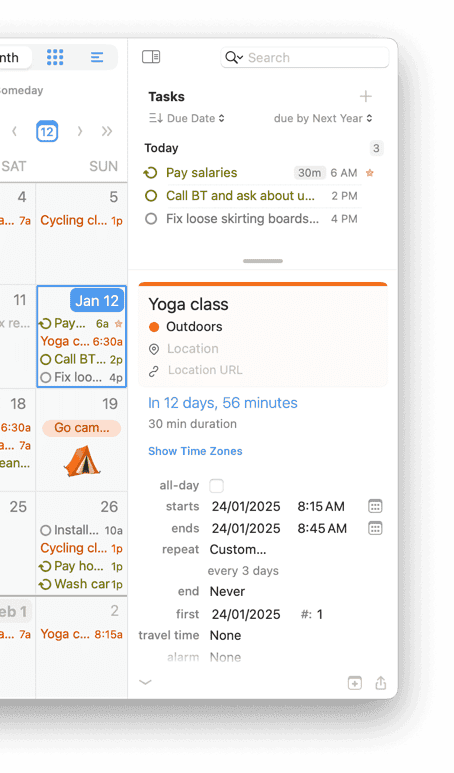
The Info Panel can appear in the righthand sidebar, where it’s always available when an event or task is selected. To display the Info Panel in the sidebar if it’s not currently visible, click the Hide/Show Task List button, choose View > Show/Hide Task List, or press ⌘-Option-T. (The pop-up menu on the right side of the Hide/Show Task List button lets you select whether the right sidebar shows the Task List, the Info Panel, or both.)
Info Panel as Popover
Alternatively, the Info Panel can appear as a popover, which disappears as soon as you click outside it. To display the Info Panel as a popover, first go to BusyCal > Settings > Info Panel and make sure the Display Info Panel in floating window checkbox is deselected. Then:
- If the Info Panel in the righthand sidebar is hidden (see above), the popover appears when you select an event in the calendar or a task in the Task List and press
⌘-Return, or double-click an event in the calendar or a task in the Task List. If Open Info Panel for new events is selected in BusyCal > Settings > Info Panel, the popover also appears when you create a new event or task. - If the Info Panel in the righthand sidebar is visible (see above), the popover never appears.
Info Panel as Floating Window
The Info Panel can also appear as a movable, resizable, floating window. To display the Info Panel as a floating window, first go to BusyCal > Settings > Info Panel and select the Display Info Panel in floating window checkbox. Then:
- If the Info Panel in the righthand sidebar is hidden (see above), the floating window appears when you select an event in the calendar or a task in the Task List and press
⌘-Return, or double-click an event in the calendar or a task in the Task List. If Open Info Panel for new events is selected in BusyCal > Settings > Info Panel, the floating window also appears when you create a new event or task. - If the Info Panel in the righthand sidebar is visible (see above), the floating window appears only when you double-click an event in the calendar or a task in the Task List.
Need to keep event details visible while you continue navigating your calendar? You can open event details in a separate window at any time. See Get Info in New Window.
Customizing the Info Panel
The Info Panel is customizable. You can choose to show just the basics, or add additional fields like tags, graphics, or attachments.
Choose BusyCal > Settings > Info Panel and check Open Info Panel for new events to automatically open an Info Panel popover (or selecting the title in the embedded Info Panel, if visible) when creating a new event.
For more information, see Info Panel.
Suggestions as Templates
BusyCal can suggest existing events and tasks as templates while you create or edit an event. Start typing to see matching past and future events.
When you select a suggestion, properties from that event—title, time of day, alarms, attendees, and optionally notes—are copied to your new event, making it quick to recreate recurring meetings or appointments.
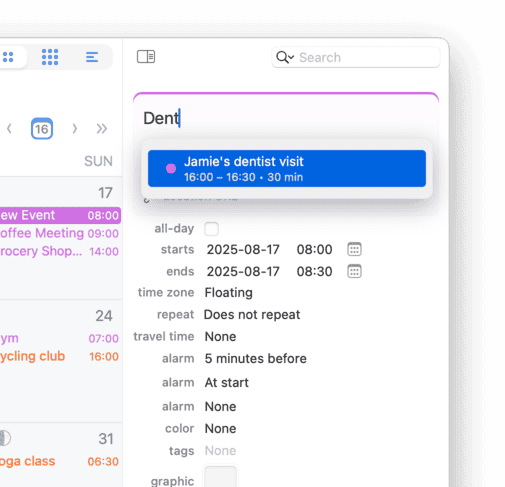
Suggestions automatically appear as you type in the Info Panel, Month View, Week View, and Day View. By default, all subscribed calendars are searched for suggestions (except holiday calendars), but you can customize this behavior in Settings > Suggestions to search only enabled calendars or to select which properties should be included when applying a template.
For more information, see Suggestions as Templates.
Tasks
Tasks in BusyCal appear directly in your calendar on their due dates, or in the Task List in the right sidebar.
Tasks can be dated or undated. Dated tasks show up in the calendar on their due date. Undated tasks appear only in the Task List.
Show Tasks in the Calendar
Dated tasks and completed tasks appear in your calendar on their due or completion dates. When a task isn't completed by its due date, it carries forward each day until finished (this is customizable in Settings). Carried-forward tasks show a small > arrow in the checkbox. Completed tasks show a checkmark on the date they were finished.
Task List
To show the Task List, choose View > Show Task List, press ⌘-Option-T, or click the Hide/Show Task List button on the right side of the toolbar and select Show Task List or Show Both. The Task List appears in the right sidebar.
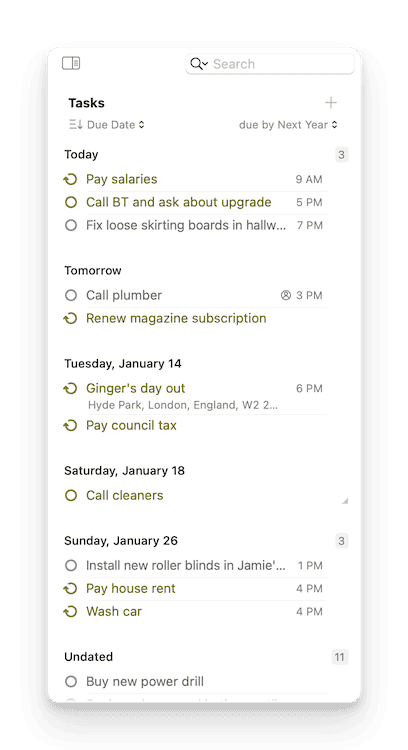
The Task List can be sorted by Due Date, Priority, Title, Calendar, Tag, or manual arrangement. To change sort order and other task preferences, go to BusyCal > Settings > Tasks.
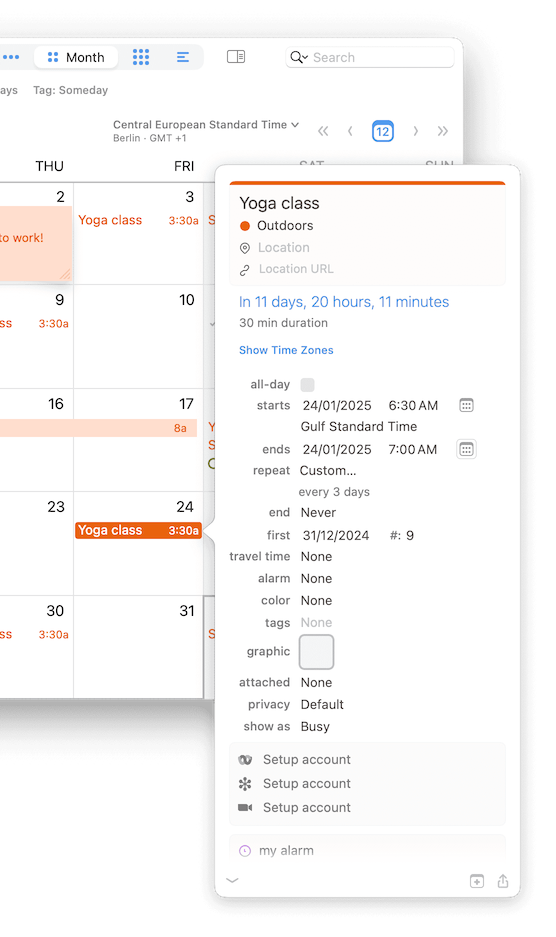
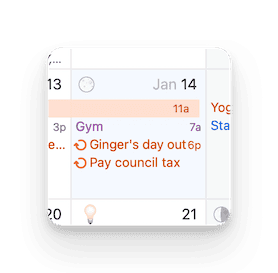
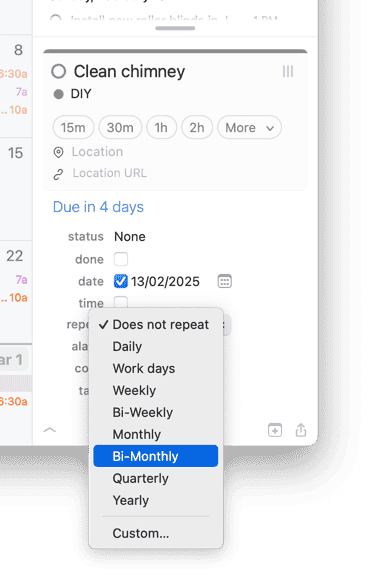
Repeating Tasks
You can create repeating tasks for recurring responsibilities. The example below shows a task that repeats every two months.
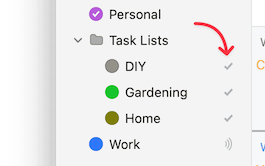
Task Calendars
Calendars syncing from cloud services like iCloud, Google, Outlook, and Reminders are always type-specific, meaning each calendar can contain either events or tasks, but not both. Task calendars are marked with a checkmark icon next to their name in the left sidebar.
BusyCal allows you to create offline On My Mac calendars from File menu > New Calendar > On My Mac, which are stored locally within your copy of BusyCal. These calendars support both events and tasks in a single place.
Creating Tasks
With all that background information behind us, it’s time to create a task.
- Click on today’s date in your calendar, then choose File > New Task (or press
⌘-K), to create a new dated task with a due date of today. The task appears in your calendar with a checkbox in front of it. - You can drag the task to a different date, and its due date changes in the Info Panel.
If you drag the task to a past date it continues to be displayed on today, because past due tasks automatically carry forward to the current date (you can disable that option in BusyCal > Settings > Tasks).
- If you mark the task as completed by checking the done checkbox in the calendar or Info Panel (or pressing
⌘-/), the completed task appears with a checkmark in front of it on the date that it was completed. - To create an undated task, choose File > New Undated Task (or press
⌘-U), and the new undated task appears in the Task List.
For more information, see Tasks.
BusyCal Menu
BusyCal includes a menu bar app that provides one-click access to your calendar and enables you to add events, even when BusyCal isn’t running. The BusyCal menu displays a navigable mini month view, a scrolling list of upcoming events and tasks, the weather forecast for today and upcoming days with events or tasks, and a Quick Entry field for creating new events with natural language.
To display the menu, click its icon in the menu bar or press Control-⌘-B.
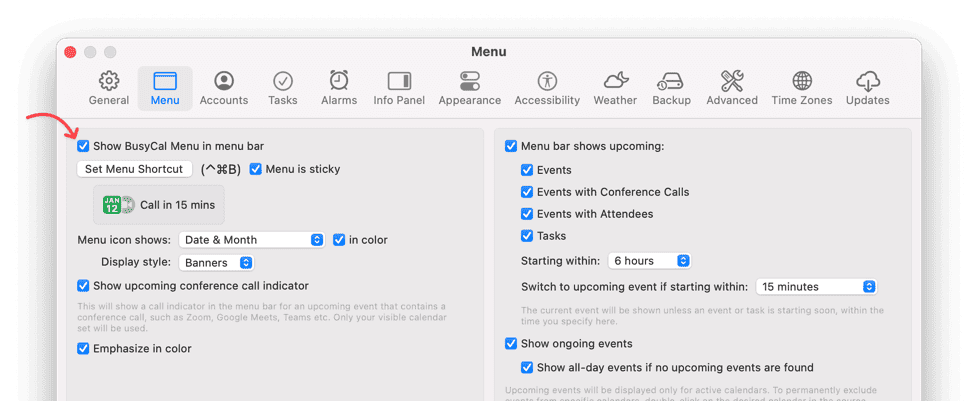
Enabling the BusyCal Menu
To display the BusyCal Menu in your menu bar, go to BusyCal > Settings > Menu and select the Show BusyCal Menu in menu bar checkbox. This opens a background application that loads at login and continues running even when BusyCal has quit.
Using the BusyCal Menu
To display the BusyCal Menu, click the menu bar icon or press the BusyCal Menu keyboard shortcut, Control-⌘-B.
With the BusyCal menu open, you can do the following:
- Detach (tear out) the menu into a floating window if you want to keep it visible while working in other apps.
- Click the left or right arrow button to move across any number of months in either direction.
- Scroll the list of daily events and tasks using your trackpad, Magic Mouse, or scroll wheel; the agenda supports infinite scrolling.
- Click or use the arrow keys to select an item. A popover appears with the details of the event or task. Click the Show button in that popover to open the event or task in BusyCal.
- If the item is a task, you can mark it as complete by clicking the done checkbox.
- Double-click an event, or press Return with an event selected, to open the event in BusyCal.
- Create new events using natural language by typing in the Quick Entry field at the top of the menu.
For a complete list of BusyCal Menu keyboard shortcuts, see BusyCal Menu Shortcuts.
The BusyCal Menu app is a lightweight calendar extension that resides in the menu bar. You can detach it as a floating window, resize it, and it remembers its last on-screen position and size. For full calendar access and advanced features, use the main BusyCal app.
For more information, see BusyCal Menu.
Upcoming Event Countdown in the BusyCal Menu
The BusyCal menu bar app also shows a real-time event countdown—counting down to upcoming events and counting up during ongoing ones.

For more information, see BusyCal Menu.
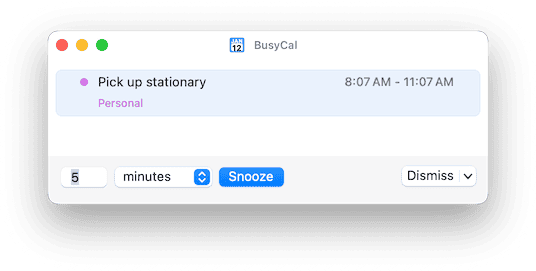
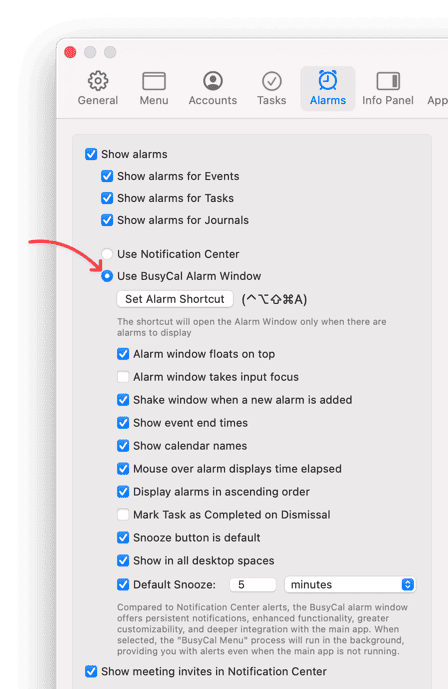
Alarms
BusyCal can display alarms through its own Alarm window or via macOS Notification Center.
The BusyCal Alarm Window offers snooze options for any duration (minutes, hours, or days), the ability to mark tasks complete directly from the alarm, and calendar identification with names and colors.
Enable BusyCal Alarm Window
To use the BusyCal Alarm window, go to BusyCal > Settings > Alarms, check Show alarms, and select Use BusyCal Alarm Window.
Creating an Alarm
To try alarms, create a new event: click on today's date, choose File > New Event, set the start time for about two minutes from now, and set the alarm to "At start".
Then wait a minute or two for the alarm to appear. When it does, you can snooze or dismiss the alarm, or double-click the event to select it in your calendar.
For more information, see Alarms.
Learn more about the difference between relative alarms vs. absolute / fixed date+time alarms.
Graphics
You can add graphics to your calendar to highlight holidays, special events, and other dates.

Graphics Panel
Choose Window > Graphics Panel to open a floating window of images you can drag onto your calendar. Browse Emoji images built into macOS, or search for images on IconFinder.com. You can also drag images into BusyCal from your desktop or a web browser.
For more information, see Graphics.
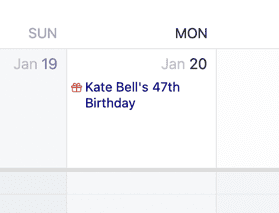
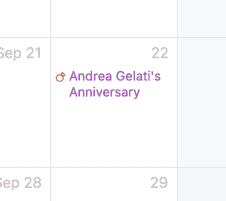
Birthdays and Anniversaries
BusyCal can display birthdays and anniversaries from macOS Contacts (or BusyContacts) in your calendar. Go to BusyCal > Settings > General and enable Show Birthdays calendar and/or Show Anniversaries calendar.
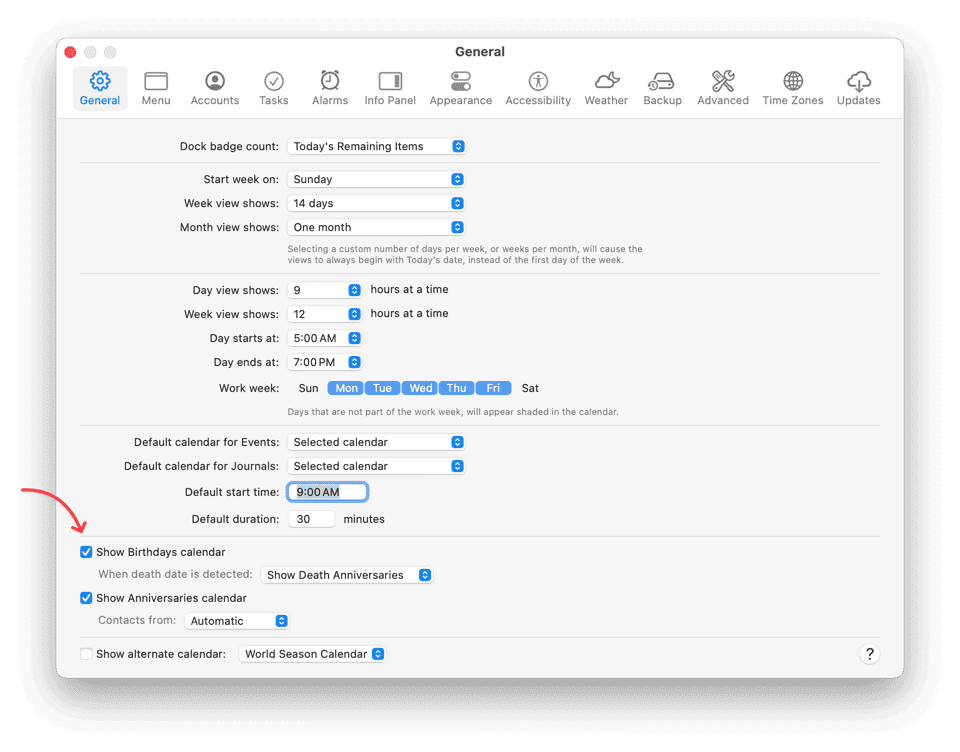
Once enabled, Birthdays and Anniversaries calendars appear under the Other section in your Calendar List, and matching contacts show up with icons in your calendar.
In addition to Birthdays, BusyCal can also display death anniversaries. When you assign a custom date labeled as Death Date in Apple Contacts or BusyContacts, you can choose how BusyCal should respond:
-
Continue Showing Birthdays: This option will always display the person's birthday. If a death date is detected, future birthdays will stop incrementing the person's age.
-
Stop Showing Birthdays: This option will stop displaying the person's birthday starting from the year of their death.
-
Show Death Anniversaries: This option will behave similarly to Continue Showing Birthdays, with the addition of displaying a yearly death anniversary event on the date of death.
For more information, see Birthdays and Anniversaries.
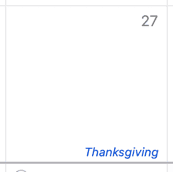
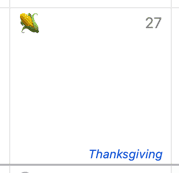
Holidays
There are many Holiday and Sports calendar feeds available on the internet from Apple, iCalShare, Yahoo Sports, and others that you can subscribe to in BusyCal or macOS Calendar. We provide a list of links to the most common US holiday and sports calendars here.
When you subscribe to a Holiday calendar, BusyCal displays all-day events on Holiday calendars in a unique style—either as a banner or as gray italicized text at the bottom of the day cell. (Double-click a calendar to open the Calendar info dialog, and check the Holiday calendar checkbox to use the gray italicized text rather than banners for that calendar.) Since BusyCal has the ability to display graphics, we created some variations of the US Holidays calendar that include graphics for major holidays. You can subscribe these US Holidays calendars from our holiday calendars section. These are available as three variants:
-
US Holidays
-
US Holidays - small graphics
-
US Holidays - large graphics
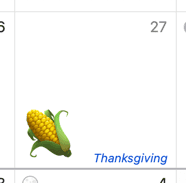
Here’s what Thanksgiving looks like for each of the US Holidays calendars (no graphics, small graphics, and large graphics) when subscribed to in BusyCal.
US Holidays calendar
US Holidays calendar with small images
US Holidays calendar with large images
For more information, see Holidays.
Favorite Time Zones
BusyCal supports multiple time zones for international scheduling. You can save favorite time zones with custom names, so you see "Tokyo Office" or "NY Client" instead of GMT offsets in drop-downs and time zone pickers.
The video below demonstrates how to create and use favorite time zones. For more details on time zones, see Time Zones.
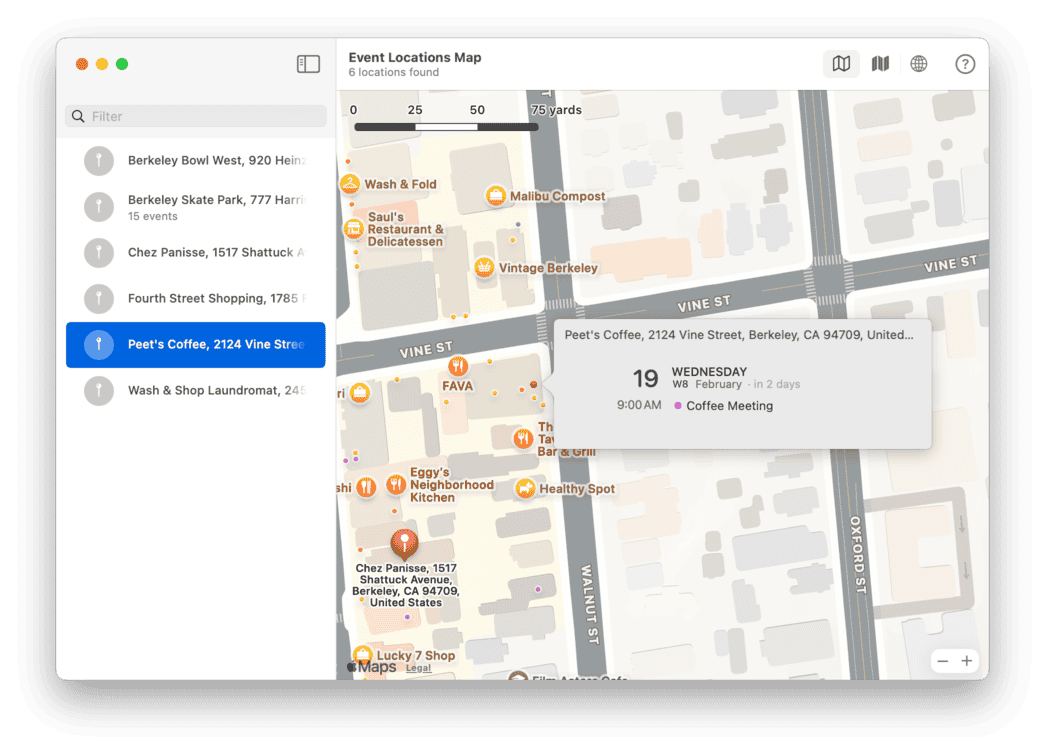
Mapping Event Locations
View all your event locations on an interactive map, past or present. Learn more.
Key Features
- See all event locations on a map – Displays location pins for events with addresses.
- Search for specific locations – Find events by location name or address.
- Navigate and zoom – Pan and zoom across your event locations.
- Find events linked to locations – Click any pin to view the associated events.
- Filter by calendar – Select individual calendars or calendar sets to narrow results.
More
That concludes the overview of BusyCal. But there’s more. Check out some of these other great features:
- Calendar Sets / Smart Filters - Create saved calendar groups and custom views
- Calendar Groups - Organize calendars into collapsible groups
- List View - View events in a sortable, customizable list
- Searching, Finding, and Filtering Events
- Tags - Categorize and filter events with custom tags
- Meetings and Invitations - Schedule and manage meetings
- Backing Up and Restoring - Protect your calendar data
- Keyboard Shortcuts - Navigate BusyCal efficiently with keyboard shortcuts